

Troubleshooting
“License expired or invalid” error when license is up to date and valid?
Issue:
New license has been applied successfully, but when logging in, system still showing the error message “License expired or invalid”.
Resolution:
This could be because the number of active users has been exceeded or invalid login details used. Check the number of active users allowed for your license, should this be the problem; check if there are any users that can be deactivated to bring your count down inline with your license or request for an increase in users to your current license by contacting your account manager or [email protected].
Login error when trying to log on to WorkFlow Designer
Issue:
Login error occurred when trying to log on to WorkFlow Designer.
“The system could not log you in because your password expired.”
Resolution:
When a user’s password becomes expired, a user can use the Reset Password functionality from within the WorkFlow to reset the password. Follow the steps:
Go to WorkFlow to request a password reset.
Enter the User Name and E-mail of the user to be reset of the password.
Wait for the email that contains the new password.
Use the new password to log in and straightway, change your password.
For password reset to be working, the site needs to be set up correctly with
SMTP server (in ApplicationSettings via Administration > Workspace).
ServerMailAddress (in ApplicationSettings via Administration > Workspace).
User’s email (in User Editor via Administration > User Editor).
How to enable trace logging in SAML2?
Issue:
SAML authentication has been configured in XMPro as described in Configure SAML 2 Authentication for XMPro Action Console and the following steps have completed by the SAML2 authentication service provider and XMPro in How to Setup SAML2 Authentication.
The user is successful redirect to the login URL as provided by the service provider. After signing in the user redirect to XMPro causes a continuous loop between the SAML authentication server and XMPro.
Resolution:
The only way to determine the issue is to see the response returned to XMPro. To view this, you will need to enable trace logging for XMPro.
Update your application’s web.config to include a <system.diagnostics> section as shown in the configuration below.
<system.diagnostics>
    <trace autoflush="true">
      <listeners>
        <add name="TextWriter"/>
      </listeners>
    </trace>
    <sources>
      <source name="ComponentSpace.SAML2" switchValue="Verbose">
        <listeners>
          <add name="TextWriter"/>
        </listeners>
      </source>
    </sources>
    <sharedListeners>
      <add name="TextWriter"
           type="System.Diagnostics.TextWriterTraceListener"
           initializeData="D:\Temp\logs\SAML\idp.log"/>
    </sharedListeners>
  </system.diagnostics>
The value for initializeData=”D:\Temp\logs\SAML\idp.log” is the file where the entries will be written to. Ensure that the IIS users have full access to the folder and file.
IMPORTANT: It is not recommended that SAML trace is left enabled in production systems as this may have an impact on performance. The log file can very quickly get big if left enabled.
Some of the most common errors are:
The username provided in the SAML response does not match the username in XMPro. In the response look for xml node saml2:NameID. The value returned for this node must match the username in XMPro.
The partner identity provider value configured in XMPro is not correctly configured. Look for ComponentSpace.SAML2 Verbose: 0 : 12:41:23 AM: Exception: ComponentSpace.SAML2.Exceptions.SAMLConfigurationException entries.
What should I do if I encounter the error "Failed to enable constraints when using SQL Connector?
Issue:
At runtime, the SQLConnector throws an exception with a message: “Failed to enable constraints. One or more rows contain values violating non-null, unique of foreign-key constraints.”
This is a very generic error message that is raised by the .NET framework when it executes the query and populates the underlying dataset that is created by the SQLConnector.
Resolution:
This problem is usually caused by one of the following:
Null values returned for columns not set to AllowDBNull.
Duplicate rows being returned with the same primary key.
A mismatch in column definition (e.g. size of character field) between the database and the dataset.
To resolve this issue, try the following:
If the query was changed or the underlying tables/views used have been changed then remap the query for the SQLConnector using the Integration Wizard. This is especially true if a new field was added to the query.
Run the query natively and look at the results, if the resultset is not too large. If you’ve eliminated null values, then the problem usually is that the primary key column is being duplicated.
Include all the key columns and the columns defined as “not null” into your queries.
How to resolve issue Upload Control Not Responding?
Issue:
From Chrome Version 61 onwards, Upload Control in Object Groups is not responding for older versions of WorkFlow (6.1, 6.5, etc.).
Resolution:
Open Site.Master file in <XMPro_Installation_Directory>
Inside <script type=”text/javascript”></script> place the following JavaScript window.onload function
// Some code
window.onload = function () {

var GetDocumentScrollTop = function () {

var isScrollBodyIE = ASPx.Browser.IE && ASPx.GetCurrentStyle(document.body).overflow ==”hidden” && document.body.scrollTop > 0;

if (ASPx.Browser.WebKitFamily || isScrollBodyIE) {

if (ASPx.Browser.MacOSMobilePlatform)

return window.pageYOffset;

else if (ASPx.Browser.WebKitFamily)

return document.documentElement.scrollTop || document.body.scrollTop;

return document.body.scrollTop;

}

else

return document.documentElement.scrollTop;

};

var_aspxGetDocumentScrollTop = function ()

if (__aspxWebKitFamily) {

if (__aspxMacOSMobilePlatform)

return window.pageYOffset;

else

return document.documentElement.scrollTop || document.body.scrollTop;

}

else

return document.documentElement.scrollTop;

}

if (window._aspxGetDocumentScrollTop) {

window.aspxGetDocumentScrollTop = _aspxGetDocumentScrollTop;

window.ASPxClientUtils.GetDocumentScrollTop = _aspxGetDocumentScrollTop;

} else {

window.ASPx.GetDocumentScrollTop = GetDocumentScrollTop;

window.ASPxClientUtils.GetDocumentScrollTop = GetDocumentScrollTop;

}

/* Begin – > Correct Scrollleft */

var GetDocumentScrollLeft = function () {

var isScrollBodyIE = ASPx.Browser.IE && ASPx.GetCurrentStyle(document.body).overflow ==”hidden” && document.body.scrollLeft > 0;

if (ASPx.Browser.WebKitFamily || isScrollBodyIE) {

if (ASPx.Browser.MacOSMobilePlatform)

return window.pageXOffset;

else if (ASPx.Browser.WebKitFamily)

return document.documentElement.scrollLeft || document.body.scrollLeft;

return document.body.scrollLeft;

}

else

return document.documentElement.scrollLeft;

};

var_aspxGetDocumentScrollLeft = function () {

if (__aspxWebKitFamily) {

if (__aspxMacOSMobilePlatform)

return window.pageXOffset;

else

return document.documentElement.scrollLeft || document.body.scrollLeft;

}

else

return document.documentElement.scrollLeft;

}

if (window._aspxGetDocumentScrollLeft) {

window._aspxGetDocumentScrollLeft = _aspxGetDocumentScrollLeft;

window.ASPxClientUtils.GetDocumentScrollLeft = _aspxGetDocumentScrollLeft;

} else {

window.ASPx.GetDocumentScrollLeft = GetDocumentScrollLeft;

window.ASPxClientUtils.GetDocumentScrollLeft = GetDocumentScrollLeft;

}

/* End -> Correct ScrollLeft */

};
This will fix the issue of Upload Control not responding to the latest Chrome versions and older XMPro versions.
How do I update the Connection String when the site.config is encrypted?
This version of XMPro by default encrypts the site.config versus an unencrypted file in previous versions. It was found that the site.config was left unencrypted when a site was implemented even though the encrypt function was present.
This encrypting of the file raises some interesting questions around the updating of details specifically the main SQL connection string to the site.
The update of the SQL connection string can be done in the following manner:
You need to be on the web server that is hosting the XMWorkspace (The web services cannot be accessed remotely).
Navigate to (replacing the items in [] as required): http://[Server name]/[site name]/administration/genericwebservice.asmx
Click the UpdateConnectionString.
In the Value text box update the connection string (replacing the [] as required): Data Source=[];Initial Catalog=[];User ID=[];Password=[]
Click Invoke and wait for the popup to state Completed.
Once done an IISRESET or an APP Pool reset for the site in question is required. This is required as your updating the main SQL connection string for the site.
How do I resolve the Unexpected Runtime JavaScript Errors?
This can be resolved using the following steps:
Uninstall the Google Frame for IE 8 using the Administrative Tools-> Add Remove Programs.
Restart IE and make sure that Google Frame does not appear in the Add Ins.
Open the WorkFlow and the issue will be resolved.
The reason for the unexpected JavaScript errors is that the Dev Express controls that are used within the WorkFlow do not support the Google Frame plugin.
Refer to the following Dev Express Support article: http://www.devexpress.com/Support/Center/p/S33520.aspx
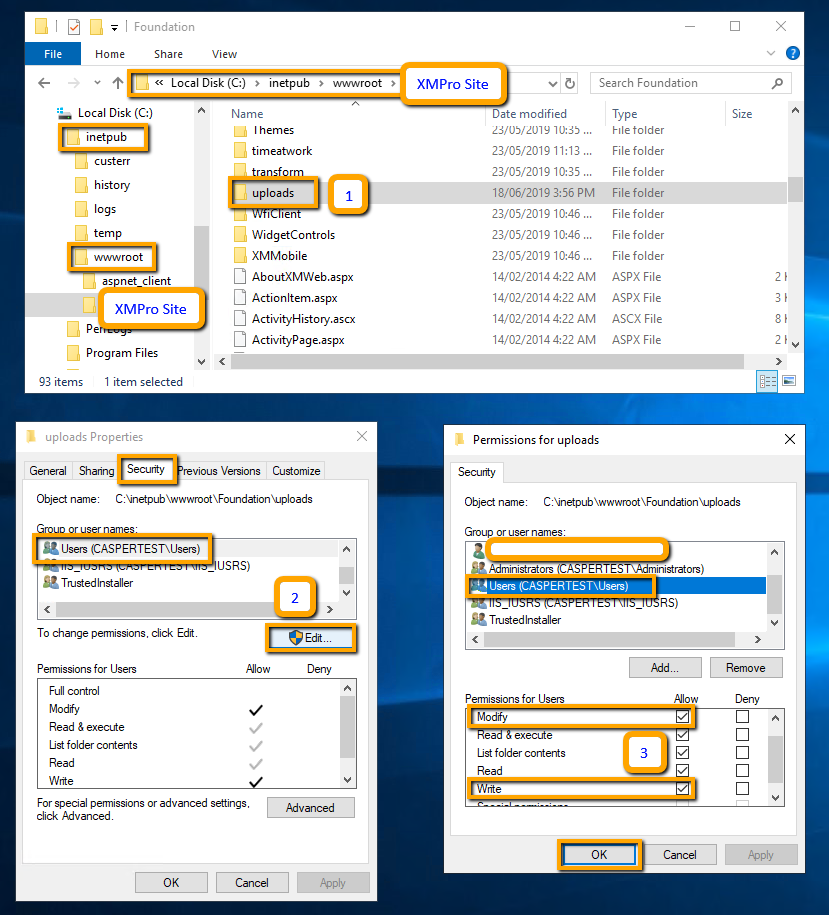
How to resolve “Error triggering: Access to the path.” is encountered when attaching file via File Attachment control?
Issue:
When attempting to attach a file via a File Attachment control, below error is thrown after clicking the submit trigger button:
Error triggering access path: ‘C:\inetpub\wwwroot\XMPro Site\uploads\Document1.xlsx’ is denied.
Resolution:
Allow Modify and Write rights for Users group for the uploads folder sitting under the XMPro web folder.
Follow the steps to achieve this:
Locate the uploads folder under the XMPro Site.
Right-click on the uploads folder to Properties and Edit the Users group.
Tick on Modify and Write to allow the rights and click ‘OK’.
How to resolve "Error Triggering: The device is not ready." when submitting a task?
Issue:
An error is encountered when submitting a task with a file attached. Error displayed:
"Error Triggering: The device is not ready."
Resolution:
Check the Repository Directory setting in the WorkFlow Designer. This can be found under the Administration tab Workspace. Make sure the path exists in the XMPro application server.
Issue:
A process is created but is not displaying on the website.
Resolution:
The first activity of a process needs to be assigned to a Business Group. Make sure that certain users are part of the Business Group. Click the Activity, then in the Property window click on EventCreate. Assign the Creation Type as ‘First Activity’ and for the Creation Value, select a Business Group.
Browse page not displaying value
Issue:
In WorkFlow, Browse Page fields may not display their values. The underlying field contains the value but it is not displayed.
This is caused by a styling issue on the underlying Dev Express control due to enforcing a “strict” DOCTYPE on all controls. The styling issue causes the font-size attribute to be set to 0 (zero) on all td elements:
td.dxic
{
font-size: 0;
}
Resolution:
To resolve this, override the style in the style.css file in your skin directory by adding the following CSS rule:
td.dxic
{
font-size: inherit !important;
}
This issue has been encountered in v6.5 of XMWorkspace.
For further information see the following ticket in Dev Express Knowledge Base: ASPxTextBox - Font Size with em stopped working
How to resolve when task is missing in both “In Progress” and “Completed” track list?
Issue:
This can be possibly be caused by the following:
The account being used does not have the tracking right to the process the task belongs to.
Tracking permission has not been set up properly for the activity.
Resolution:
For possible cause 1:
Assign the user account tracking right of the process the task belongs to.
Find the role in the All Employees group and highlight the role, then click the Tracking Rights button.
The Tracking Editor window will then open. Select the process from Available Processes to Current Processes by clicking the > button.
Processes can be removed from Current Processes by highlighting and clicking the < button.
When finished, click OK and save.
For possible cause 2:
Highlight the activity, set Allow Tracking to True so that users that have tracking rights to the process can track the tasks in the tracking menu.
Set Allow Value Tracking to True so that users that have tracking rights to the process can track the details of the tasks. If this property is set to False and the Allow Tracking property is set to True, the user can track the process in the tracking menu in the XMPro Workspace, but the user cannot click on the activity in the tracking to see the values entered in that activity.
Why am I getting a "Server Error – Maximum Request Length Exceeded"?
Cause:
The attached file size is larger than the upload file size that has been set up in Web.config.
Resolution:
Attach a file that doesn’t exceed the file size that has been set up.
To increase the upload file size, use the following section in web.config file:
<httpRuntime maxRequestLength=”2097151″ />Resolving error when opening a Process Group: “An unhandled exception of type System.Runtime.InteropServices.COMException”
Issue:
This error occurs when trying to open a process group:
“An unhandled exception of type System.Runtime.InteropServices.COMException has occurred.”
This issue applies to XMPro v6.0 or below running under Windows Server 2008 R2.
Resolution:
To resolve this type of issue, register the msscript.ocx.
efore running Regsvr32 msscript.ocx, make sure the msscript.ocx file is in C:\Windows\System32 folder.
Click the Start button, then in the Start Search box, type CMD but to NOT press Enter.
In the Programs section of the displayed list, right-click the command prompt > Run as Administrator and click Continue.
In the open window, type the following command and press Enter:Regsvr32 msscript.ocx.
Verify that the registration is successful.
An alternative way to register the msscript.ocx is by navigating through your computer’s local directory.
How do I resolve the error: ‘A column named already belongs to this table’?
Issue:
When getting an error similar to this in a form/activity:

Resolution:
Check fcEventCreate table in the XMPro database with the EventID of your activity, there might be two rows in fcEventCreate table for this particular activity. Remove the one that is not required should solve the problem.
How to handle empty space in a dashboard?
Issue:
If we have a Dashboard with few controls, when we open the dashboard from XMPro WorkFlow the dashboard viewer will auto expand the dashboard controls to the maximum space. This will stretch the dashboard controls and may not look good.
Look at the dashboard below where the chart bars are very thick and unnecessarily occupy all the space and stretches the chart on the entire page.

Resolution:
To overcome the auto stretch, we can add a few card controls to the dashboard without a caption. The card control introduces space and will not auto stretch the existing chart control.
So if we look at the updated dashboard in the below diagram we can see the chart control is not auto stretched till the end.

If we look at the design time for the above dashboard:

We can see the card control (without a caption) is placed next to the chart control. This card control will stop the auto expand of the chart control until the end. This way we can better align the dashboard to provide a better look and feel based on end users requirements.
Dashboard – Group Control Changing Ignore Master Filter
First, you need to remove the Ignore Master Filter set on the group so that the master filters apply to the dashboard controls added to the group. You can access to the Ignore Master Filter setting for a group by clicking on the group and click on the data tab.
For example, you can see in the below dashboard designer, we have a group control and the group controls Ignore Master Filter is on by default, we need to click the ignore Master Filter once to turn it off. This applies the master filters to any controls that are added to the group.

The dashboard below shows when the Ignore Master Filter for the group is off.

Last updated
Was this helpful?