

Configuration
Drop-down List in Managed Code
Use Case:
You need to change the list values in a drop-down box on refresh.
The list of values in a drop-down are different, based on the current user.
Solution:
The following code should be placed in the code editor for the control being changed.
public void NS10Dropdown_OnRefresh()
{
    Grp = activity.ObjectGroups["0"]; //Object group containing the control
    List<string> list = new List<string> { "o1", "o2", "o3", "o4"}; //list containing all dropdown values
    Grp["NS10Dropdown"][0, true] = list;
}Code Recommendations:
When setting the drop-down list, you should trim each value of whitespaces otherwise the control value might not be set properly in code.
The drop-down list is not passed from one activity to another but the value is. Trying to retrieve the list will result in a null reference exception.
Setting the drop-down value to a value that doesn’t match 1:1 with the value in the drop-down will result in the value being blank.
Why doesn’t “Enable Script IDE” option show in WorkFlow Designer for my process?
Issue:
The “Enable Script IDE” option is not showing in WorkFlow Designer.

Solution:
To display the option, follow the steps listed. Note that one should be a Super Admin to be able to perform the process.
Open the Options Editor by clicking on the file tab.
Select “Options” from the menu.
In the Options Editor prompt, click the “…” button under Access Rights, making sure that Administration is highlighted/selected from the options list.
Select the user that needs access to Script IDE. Under the “Other” tab, tick “Allowed Access” for Script IDE. Then click OK to wrap.
How to enable out of the box XMPro processes such as Process Archive?
XMPro has a few admin processes that are readily available and needs to be enabled if these processes are meant to be accessed by an admin user.
The out of the box processes are:
Archive Process
Edit Best Next Action Guide
Edit Landing Page Options
Task Reassign
Solution:
1. Enabling access to the Process Archive process design.
Log in to the site
Go to Options > Administration > Access Rights
In the Access Rights Editor, find the administrator who can access the XMPro Process
Click on the Processes tab
Tick on Read and/or Write for Process Archive
Click OK
2. Find out the Creation Type and Creation Value
Go to the Process Groups > XMPro Processes > Process Archive
Click on Archive Process Task
Go to the Task Properties
In property Event Create, note the Creation Value of the task
For example: Creation value is XMPro Administration

3. Enabling access to Business Group XMPro Administration
Go to Options > Administration > Access Rights
In the Access Rights Editor, find the administrator who can access Business Groups
Click on Business Groups tab
Tick on Read and/or Write for Business Group XMPro Administration
Click OK.
4. Assign User to the Business Group so that the Archive Process can be initiated by the user
Go to the Business Groups > All Employees > [User]
In the Properties, go to Business Groups to see the list of business groups the user is part of
Tick on XMPro Administration and click OK.
5. Verify the process is accessible in WorkFlow
Log in to WorkFlow
Click + to initiate a new process
Select Process Group XMPro Processes
Make sure that Archive a Process is there.
How to configure SQL Server on port 443
In many enterprise networks, outgoing traffic is only allowed on HTTPS i.e. port 443. In such scenarios, it becomes impossible to connect to a SQL Server running on the default port. A solution to this problem can be to configure SQL Server to run on port 443. Use the following steps to achieve this:
Open SQL Server Configure Manager
Drill down to Protocols for SQL20XX
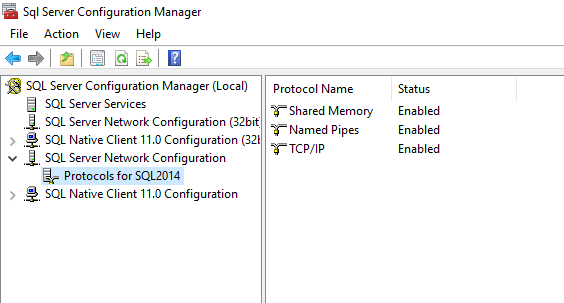
Right-click on TCP/IP and open Properties
Specify 443 for TCP Port
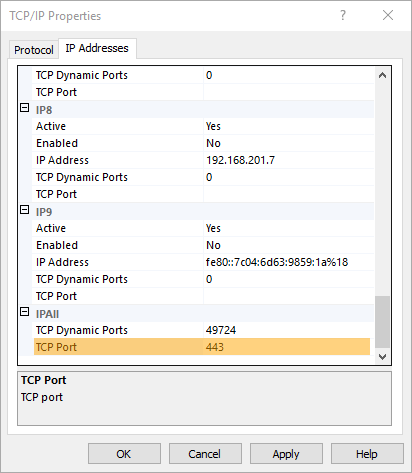
Restart SQL Server service
You can now connect to SQL Server over port 443.
Please note: IIS cannot be running on port 443 on this particular machine.
Error occurs after upgrading XMPro Action Hub to 6.7 with Subscription Manager
Scenario:
An error occurs when trying to log in to the Action Hub after upgrading to version 6.7 with Subscription Manager authentication.

Solution:
This is caused by the WebsiteUrl setup in the site.config file of the Action Hub folder does not match with the Product URL setup in Subscription Manager.
For instance:
WebsiteUrl setup in site.config of Action Hub:
https://server/actionhub/default.aspx
Product URL of Subscription Manager:
https://server/actionhub/
Correct the WebsiteURL setting in site.config using XMDesigner by the following steps:
Log on to the upgraded website using an XMPro account with administrative rights.
Click on the Administration Tab.
Click the Workspace button.
Search for WebsiteUrl from Name column of the middle panel.
Remove “defualt.aspx” in the Value column.
Save the changes by clicking on the Save button.
On the Apply Server Settings message prompt, click Yes.
How to Create a Select/Un-select All Checkbox for a Column Checkbox in a Grid
Scenario
There are instances when a select/un-select all needs to be added to a checkbox column in a grid on a form.
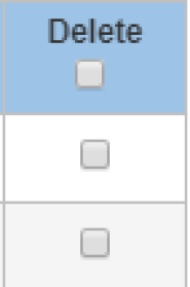
Solution
The above can be achieved by adding HTML code in the control caption.
Default HTML code caption:
{Column Caption}<br/><input id='{Unique ID of select all checkbox}' type='checkbox' onclick="$('input#{Control Name}').
each(function(){$(this).prop('checked',$('input#{Unique ID of select all checkbox}').prop('checked'));})" />
Sample HTML code in Control Caption:
Delete<br/><input id='deleteall' type='checkbox'onclick="$('input#PC30200Delete').
each(function(){$(this).prop('checked',$('input#deleteall').prop('checked'));})"/>
Please note that this method only works from XMPro 6.5 onwards
Please find below example for guidance:
Log on to XMDesigner with Administrative rights account.
Double click on Process Group from Process Explorer
Create a Process Group by dragging an activity icon from Toolbox to the middle panel
Modify the Process Group name and description from the Properties panel
Press Ctrl + S on the keyboard to save the changes then double click on the newly created process group
Modify the Process name and description from the Properties panel
Press Ctrl + S on the keyboard to save the changes then double click on the newly created process
Create an Activity by dragging an activity icon from Toolbox to the middle panel
Modify the Name and the static Activity Description of the activity from the Activity Configuration Wizard
Press Ctrl + S on the keyboard to Save the changes.
Click on the newly created Activity and go to the Properties panel.
Click on the ellipsis button next to the Event Create option
Change the Creation Type to “First Activity” and Creation Value to “All Employees”
Press Ctrl + S on the keyboard to save the changes.
Click on the ellipsis button next to the Object Group option.
Click on the “Add” button in Maintain Object Groups window, to create a new object group
Click on the newly created Object Group and modify the name and Description
Change the Grid option to “True”
Click OK to save the changes.
Double click on the Activity to open Activity Designer.
Drag and Drop a new checkbox control from the Toolbox panel to Activity Designer
Modify name and caption to the below format from Object Configuration Wizard.
Name: TP1050Select
Caption: Select <br/> <input id='cbxSelect' type='checkbox' onclick="$('input[id*=TP1050Select]').each(function(){$(this).prop('checked',$('input#cbxSelect').prop('checked'));})" />
Select the Object Group created earlier
Click “OK” to confirm the changes.
Press Ctrl + S on the keyboard to Save the changes
How do I configure a user account to run XMAlertService?
When installing XMAlertService to run under a domain user account, the account must have the right to logon as a service in the XMPro server

This logon can be granted in the Local Security Policy using the following steps:
Logon to the computer with administrative privileges.
Open the ‘Administrative Tools’ and open the ‘Local Security Policy’.
Expand ‘Local Policy’ and click on ‘User Rights Assignment’.
On the right pane, right-click ‘Log on as a service’ and select properties.
Click on the ‘Add User or Group…’ button to add the new user.
In the ‘Select Users or Groups’ dialogue, find the user you wish to enter and click ‘OK’.
Click ‘OK‘ in the ‘Log on as a service Properties’ to save changes.
Ensure that the user which you have added above is not listed in the ‘Deny log on as a service’ policy in the Local Security Policy.
Configuring the IIS in a local server for a new XMPro site installation
This applies to Windows Server 2012 and above.
In the server, type Server Manager.
In the top right menu, click Manage > Add roles and features.
Click Next on Before You Begin
Select “Role-based or feature-based installation” and click Next.

Select“Select a server from the server pool” and click Next

Select the Server Roles to add and click Next. Under the Web Server (IIS), tick the options per below:

Select the Features to add and click Install. Tick the .NET Frameworks per below:

How to pass information to a new First Activity using Parameterization?
If you want to pass an information along to a new First Activity one easy way to do it is via parameterization.
Create a submit button in WorkFlow Designer in your activity. Provide an appropriate name and save the activity.
Double click your submit button to open up the Script IDE. Under _OnSubmit, enter the following lines of codes:
string url = String.Format ("{0}/ProcessItem.aspx?g={1}&id={2}&{3}={4}",
<Workspace URL>,
<Process group ID>,
<Activity ID>,
<Name of Control>,
<Value>);
return String.Format("[NavigateTo: {0}]", url);
Where:
<Workspace URL> is the URL of your workspace
The URL you connect to
<Process Group ID> is the value of your Process Group’s ID
Can be found by opening the Process Group your activity belongs to, clicking your activity, and looking in Properties under Identification for the Parent value.
<Activity ID> is the value of your Activity’s ID
Can be found by opening the Process Group your activity belongs to, clicking your activity, and looking in Properties under Identification for the ID value.

<Name of Control> is the name of the control you want to pass a value to
<Value> is the value you want to pass
If you want to pass values to multiple controls, just add an extra &{x}={y} to the end of the first string, as well as the appropriate <Name of Control> and <Value>s at the end of url.
You should end up with something like this:

Save the script and your activity, and you’re done!
How to customize and save Grid Layout in XMPro?
The grid layout customization can be used in versions 6.1 and above. This option can be used when a grid has many columns and read-only fields.
This section demonstrates how to customize and save grid layout in forms.
Create a reference label.
Set the value of the reference label on load or refresh as shown in the example below:
stringquery = string.Format(@"EXEC sp_RequestReport_TRDataMetrics %27{0}%27, %27{1}%27, %27{2}%27, %27{3}%27",
activity.GetControlValue("DM1050StartDate"),
activity.GetControlValue("DM1060EndDate"),
activity.GetControlValue("DM1018TestSite"),
activity.GetControlValue("DM10180ProductLine"));
activity.SetControlValue("TD10180Savegrid" ,@"<iframe width='100%' height='700' frameborder='0' src='GridView.aspx?gridname=MainTR&columnHide=
True&noColumns=6&pagesize=15&cn=DataMaster&sp=" + query + "'></iframe>");
In the above example, change the stored procedure name to the one that returns the report and pass in any input parameters if required.
When setting the value to reference label, iframe has a property called gridname which can be any name.
The property columnhide defines whether the columns should be hidden when the grid is loaded.
The property noColumns defines the number of the columns to be shown in the grid by default and the rest of the columns will be added to the show customization filter control window.
The property cn is the connection string.
Below is a sample screenshot of a customized grid layout:

Clicking the Show customization window option, a pop up namely ‘Field Chooser’ will open and a user can drag and drop columns from and to the grid.

When a user clicks on save layout option, the current modified grid layout is saved and whenever a user opens the report, the saved layout is loaded by default.
When a user clicks on load layout, it loads the previously saved layout.
How can Object Group parameters be used on Browse Pages?
Browse Pages can be configured in object groups via the XMPro Integration Wizard and using the SQL Connector option to create an Integration. However, this method cannot be used if the browse pages are expecting input parameters that are also located within the Object Group, as the integration will fail to differentiate between the different parameters and combine the results. For this Use Case, a custom workaround must be used.
First, open the EditPage popup window under the browse page’s Properties section.

In the Browse Page Editor popup window, open the Data Source script
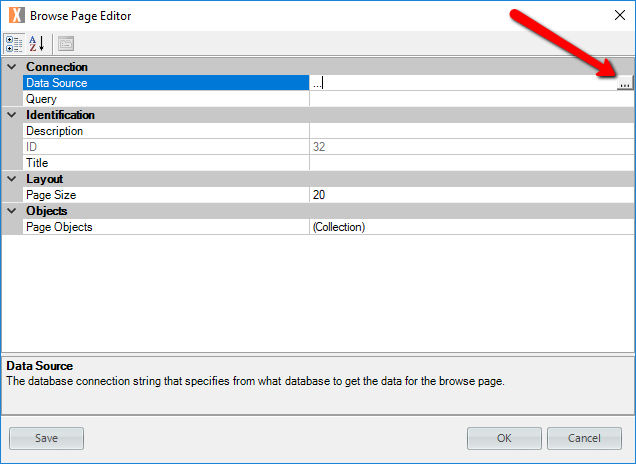

Add the below code snippet, modifying the input parameters, stored procedure and Data Connection as required.
System.Data.DataTable dt = new System.Data.DataTable();
System.Data.DataSet ds = new System.Data.DataSet();
string type = activity.GetControlValue("BW1080Type", groupId, lineNumber);
using (System.Data.SqlClient.SqlConnection conn = new System.Data.SqlClient.SqlConnection(customSetting.Value(process.Company, @"Connections\MASTER")))

{
     conn.Open();
     System.Data.SqlClient.SqlCommand command = new System.Data.SqlClient.SqlCommand("int_Resource_GET", conn);
     command.CommandType = System.Data.CommandType.StoredProcedure;
     command.Parameters.Add(new System.Data.SqlClient.SqlParameter("@Type", type));
     dt.Load(command.ExecuteReader());
}

ds.Tables.Add(dt);

return ds;
After saving the Data Source, open the Page Objects window.

In this editor, you will be creating and mapping the columns from the stored procedure to the browse page grid.

Description – Caption that will appear for the Browse Page column
ID – System generated identifier
Index – Used for ordering the Browse Page columns
Name – User specified identifier
Source – Name of the corresponding result column in the SQL query executed
Target – If a row is selected from the browse page, what XMPro field will be populated.
Leave blank if the column is only needed to be displayed within the browse page grid.
Now, your grouped browse page should be returning results dependent on the parameter in its individual row.
Resolving ASP.NET Error – A potentially dangerous Request.Path value was detected from the client
Issue
ASP.Net 4.0+ comes with a very strict built-in request validation, part of it checks for potentially dangerous characters in the URL which may be used in XSS attacks.
In XMPro this issue will normally occur in the following instances:
A file was uploaded containing an invalid character in the file name and is referenced in the next activity as a clickable link.
Some HTML special characters are present in a Simple Text Box or Large Text Box control during any post back event, i.e. the AutoPostBack option is set to true on a control or when submitting the form.
Resolution
Invalid file link
If the issue is caused by a file that was uploaded in upstream activities or another process in XMPro, check the “ProbihitedFileNameCharacters” setting in the site.config file. If the value is empty it will default to ‘#,&,+,?,/,:’. To add additional characters, supply the default value plus any additional characters separated by a comma, for example: #,&,+,?,/,:,~,’.This will prevent further files from being uploaded with invalid characters but will not change existing values. The XMPro engine will remove the invalid characters when the file is uploaded.
If it is a link to an existing file already uploaded or references from your site there are the following options:
The best approach is to remove the special characters from the path. These characters should cause no problem if they are passed not as part of the path but as part of the query string. This will necessitate modifying both the web page which is handling the request and those links (or services) which use it. If you absolutely need to allow one of these characters, then you can change the configuration to allow it. The setting to change is the requestPathInvalidCharacters which is part of the httpRuntime section in the web.config file.
In all likelihood even if you do have a httpRuntime section in your web.config file then you won’t have requestPathInvalidCharacters, so you will need to add it. Be aware that you are using this to specify which characters not to allow, you cannot specify which characters to allow. The default character are “<, >, *, %, &, :, \, ?”.
When entering these characters remember to HTML encode them as shown below:
<httpRuntime requestPathInvalidCharacters=”<,>,*,%,:,\,?” />When setting it you can use the empty string, but it is probably better just to remove those characters which you need as show below:
<httpRuntime requestPathInvalidCharacters=”” />In .Net versions prior to 4.0 you might need to add the requestValidationMode property as well, as shown below:
<httpRuntime requestValidationMode=”2.0″ requestPathInvalidCharacters=”” />Correct it at the source. This means the following:
Updating the name of the file in the Repository Directory,
Changing the name of the file in the fcEventValue table.
AND if referenced from another database, correct it there.
Text Box Controls
If the issue is caused by XMPro reading a value from a previous activity or a database with HTML characters, there are three options available:
Replace the Large Text Box with the new HTML Editor Control. Only available in XMPro 6.5 and higher.
Keep the Large Text Box or Simple Text Box and try and clean the value BEFORE rendering the control using the String.Replace() method, e.g. String text = “This should break </br> this is a new line”; activity.SetControlValue(“FI1080CheckingChars”, text.Replace(“</br>”,”\n”)); The problem with the above is obviously that in the worst case scenario you will need to account for more than one type of html tag. Fortunately, only the </br> or </br > characters need removing when using the XMPro Large Text Box or HTML editor type of control. For a more complete html removal functionality search Google or try this url: https://www.dotnetperls.com/remove-html-tags.
Replace the Large Text Box or the Simple Text Box with a Reference Label. The downside of this is that if there is a lot of content, then everything will be rendered on the form. With a Large Text Box where the ReadOnly property is set to True, a scrollbar will be shown if the content exceeds the height of the control.
Resolving ASP.NET Error – ThrowIfMaxHttpCollectionKeysExceeded
Issue
On December 29, 2011, Microsoft released a security update KB2656356 / MS11-100 for ASP.NET to address a potential Denial of Service vulnerability. In the update, Microsoft introduced a limit to the number of data elements on an ASP.NET form or on a JSON payload. The default limit is 1000 data elements. Exceeding this limit will cause a ThrowIfMaxHttpCollectionKeysExceeded error.
In XMPro, this issue will occur during a post back event, e.g. submitting a form when there are more than 1000 controls on a form. This number is very easy to be exceeded, especially in data capturing type forms.
Resolution
Fortunately to fix this issue is very easy. To change the default MaxHttpCollectionKeys limit, add the following to your web.config file in the section in the section and put a large value.
<appSettings>
<add key=”aspnet: MaxHttpCollectionKeys” value=”5000″></add>
</appSettings>
References
Knowledge Base article: An ASP.NET request that has lots of form keys, files, or JSON payload members fails with an exception
How do I sync data warehouse with my XMPro WorkFlow Database?
Create a SQL Job that runs the “xmi_Update” stored procedure located in the Data Warehouse database.
Recommendations:
Create the Job to run the update overnight (“xmi_Update” stored procedure) on the Data Warehouse.
If more frequent updates are required, for example, update every 15 minutes, monitor the SQL Server to ensure there is no excessive load that could have a negative impact on other systems using the SQL server.
The first run of the data warehouse update on a pre-existing XMPro database could take many hours to complete. Please take this into consideration when scheduling the first update.
After the stored procedure has run for the first time amend the “xmi_Update” stored procedure and comment out the command “exec xmi_SchemaRemoveCustomTables”.
“xmi_Update” stored procedure structure:
The following commands are responsible for updating the data warehouse data from the XMPro Core Database
exec xmi_BatchUpdateTransactionLog
exec xmi_BatchUpdateTransactionValue
exec xmi_SetLastTaskID
When major changes to the XMPro Processes/Activities are made, it is recommended that the “exec xmi_SchemaRemoveCustomTables” command is run.
At all other times, this command should not be run.
The command “exec xmi_SchemaRefresh” will amend any changes to tables or create any new custom tables.
The command “exec xmi_BatchUpdateCustomTables” will populate the custom tables created by the “xmi_SchemaRefresh” stored procedure above.
How to change IIS in Process Session Timeout?
The default in process session timeout value is 20 minutes. This means that when a user is logged in to the XMPro WorkFlow and is for more than 20 minutes, IIS will recycle the session data resulting in the user being logged out automatically. The below steps show how to configure and amend the timeout period. For more information on Session States and in Process sessions read this article on the MSDN Microsoft developer site.
Step 1:
In the XMWorkspace web.config file (found in the root folder of the website) the following setting is available:
“<sessionState mode=‘InProc’ timeout=‘20’ />”
To amend the timeout value, find the setting in the web.config file and amend the timeout value to the required value.
Step 2:
In IIS, find the appropriate website application pool that the WorkFlow is linked to. Navigate to Advanced Settings (right click->Advanced Settings) and change the setting “Idle Time-out (minutes)” value to the required value.

How to setup SAML2 authentication?
Before configuring XMPro to use SAML2 to authenticate users, as described in the article: Configure SAML 2 Authentication for XMPro Action Console, the following steps must be completed by the SAML2 authentication service provider and XMPro.
XMPro
XMPro must provide the following to the service provider to be used to configure SAML2 authentication:
Logout service: https://xmproapplication.com/authentication/saml/sloservice.aspx
Assertion service: https://xmproapplication.com/authentication/saml/AssertionConsumerService.aspx
Service provider name (SPID): Set it to the domain name of the XMPro application e.g. xmproapplication.com
The service provider might require a metadata file that contains all this information above. An example provided below.
<!-- Service provider SAML metadata -->
<md:EntityDescriptor entityID="xmproapplication.com" xmlns:md="urn:oasis:names:tc:SAML:2.0:metadata">
    <md:SPSSODescriptor WantAssertionsSigned="true" protocolSupportEnumeration="urn:oasis:names:tc:SAML:2.0:protocol">
        <md:KeyDescriptor>
            <ds:KeyInfo xmlns:ds="http://www.w3.org/2000/09/xmldsig#">
                <ds:X509Data>
                    <ds:X509Certificate></ds:X509Certificate>
                </ds:X509Data>
            </ds:KeyInfo>
        </md:KeyDescriptor>
        <md:SingleLogoutService Binding="urn:oasis:names:tc:SAML:2.0:bindings:HTTP-Redirect" Location="https://xmproapplication.com/authentication/saml/sloservice.aspx"/>
        <md:NameIDFormat>urn:oasis:names:tc:SAML:2.0:nameid-format:transient</md:NameIDFormat>
        <md:AssertionConsumerService index="1" Binding="urn:oasis:names:tc:SAML:2.0:bindings:HTTP-POST" Location="https://xmproapplication.com/authentication/saml/AssertionConsumerService.aspx"/>
    </md:SPSSODescriptor>
    <md:Organization>
<md:OrganizationName xml:lang="en">XMPro</md:OrganizationName>
Service Provider
The service provider will provide the following to XMPro.
PartnerIdentityProviderName: samlprovidername.com
SingleSignOnServiceUrl: https://samlprovidername.com/idp/profile/SAML2/Redirect/SSO
SingleLogoutServiceUrl: https://samlprovidername.com/idp/profile/SAML2/Redirect/SLO
SAML signed certificate: Copy this into the root folder of the XMPro website.
The service provider may provide XMPro also with the metadata file generated by the SAML2 server that will contain the information above. An example snippet from the file is shown below:
<?xml version="1.0" encoding="utf-8"?>
<EntityDescriptor …..
<SingleLogoutService Binding="urn:oasis:names:tc:SAML:2.0:bindings:HTTP-Redirect" Location="https://samlprovidername.com/idp/profile/SAML2/Redirect/SLO " />
    <SingleSignOnService Binding="urn:oasis:names:tc:SAML:2.0:bindings:HTTP-Redirect" Location=" https://samlprovidername.com/idp/profile/SAML2/Redirect/SSO " />
    <SingleSignOnService Binding="urn:oasis:names:tc:SAML:2.0:bindings:HTTP-POST" Location=" https://samlprovidername.com/idp/profile/SAML2/Redirect/SSO " />
  </IDPSSODescriptor>
</EntityDescriptor>
How to embed CAD drawings in XMPro Activity?
Background
To view CAD drawings currently in XMPro, the drawings are loaded as images or as a hyperlink.
The option below embeds the CAD drawings directly into the activity.
Configuration
To configure and load CAD drawings inside a XMPro activity:
Create a reference label and set the value using the CAD link. Below is an example:
activity.SetControlValue("LW70620CAD", "<iframe src='http://cad.emersonregulators.com/
item/630-series/630-series/pn-630-6?pageFrom=pc&configToken=I3T5OMY7x4g3lzGFtU2l
-BZdzmff5gZAaNJoIDdJhhQSLOUqgpii3LRayg0K7lUY' width='100%' height='1200' frameborder='no'></iframe>");
How to configure SAML 2 authentication for XMPro WorkFlow?
Background
The XMPro WorkFlow supports four modes of authentication, namely:
XMPro: Users are presented with an XMPro login screen
Windows: The Action Console will attempt to log the user in automatically using the user’s active Windows credentials. The domain username must match the username of the user in XMPro.
SAML 2: The WorkFlow will attempt to log the user in automatically using the user’s associated SAML credentials. The domain username must match the username of the user in XMPro.
Mixed: A mixture of the (aforementioned) ‘XMPro’ and ‘Windows’ and ‘SAML2’ authentication modes. The WorkFlow will first attempt to log the connecting user in using the user’s associated SAML2 credentials, should this fail Active Directory credentials.
XMPro and Windows authentication have been around for a long time in the XMPro WorkFlow, whereas SAML 2 authentication has been available only from XMPro WorkFlo v6.1. This article will focus on the configuration of SAML 2 authentication for use in the XMPro WorkFlow.
Configuration
The following settings are set from the Workflow Designer that is part of the XMPro Agile Design Studio.
On the Settings tab click on Workspace in the General section. This will open the ApplicationSettings window. Change the value of the AuthenticationMode to ‘SAML2’ or ‘mixed’. It might be required to set the mode to ‘mixed’ to allow access when using the Workflow Designer. Click on Save or Ctrl+S to save your changes. You will be prompted to ask if you want to reload Server Settings. Click No. The server settings will be reloaded as the last step.
On the Settings tab click on SAML2 in the Custom Settings section. Change the ‘enabled’ value to ‘true’ as shown below. The other two ‘key’ type settings will be configured in the next steps.
On the Settings tab click ServiceProvider in the Custom Settings section. It will show the following values that needs setting. After setting the values Click on Save or Ctrl+S to save your changes. *ServiceProviderName: The provider name. Set it to the domain name of the XMPro application, e.g. xmproapplication.com
*AssertionConsumerServiceUrl: the service provider’s assertion consumer service (ACS) URL. The assertion consumer service URL is the endpoint at which the SAML response is received.
ServiceProviderCertificateFile: The certificate file path. The file path is either absolute or relative to the application folder
CertificatePassword: The certificate file password. (*) are required fields.
On the Settings tab click on PartnerIdentityProvider in the Custom Settings section. It will show the following values that needs setting. After setting the values Click on Save or Ctrl+S to save your changes.
PartnerIdentityProviderName: The provider name that will be providing the service.
SignAuthnRequest: A false or true value indicating whether to sign authentication requests.
WantSAMLResponseSigned: a false or true value indicating whether SAML responses should be signed.
WantAssertionSigned: A false or true flag indicating whether SAML assertions should be signed.
WantAssertionEncrypted: A false or true flag indicating whether SAML assertions should be encrypted.
SingleSignOnServiceUrl: The partner identity provider’s single sign-on service URL.
SingleLogoutServiceUrl: The partner provider’s single sign-on service URL.
CertificateFile: The certificate file path. The file path is either absolute or relative to the application folder.
OverridePendingAuthnRequest: A false or true value the flag indicating whether a pending authentication request may be overridden and an IdP-initiated SAML response received. If a service provider sends an authentication request, then it expects the SAML response it receives to come from the identity provider it sent the authentication request to and that the SAML response is in response to this authentication request. If a different identity provider sends a SAML response or the expected identity provider sends a SAML response but it is not in response to this authentication request, this is treated as an error if this flag is false. If this flag is true then these restrictions do not apply. Setting this flag to true supports an SP-initiated SSO flow being supplanted by an IdP-initiated SSO. All the fields are required.
The last step is to apply the changes to the site. On the Home tab in the Deployment section click on the Reload Server Settings icon and click Yes when prompted. Please note that you might need to reset the XMPro application pool for the changes to take. This is normally not required.
Dashboard – Rotating chart control view
Requirement:
There are some instances that you might want to change the view of the dashboard chart control, due to layout and space constraints.
By default, the dashboard chart plots the “Arguments” in X-Axis and “Values” in Y-Axis which will present the data as below:

The chart presents information regarding “Top 10 Most Time-Consuming Users”. On X-Axis, users are plotted and on Y-Axis the time is plotted for each user. We can also clearly see from the chart that the alignment of the X-Axis labels is not clear.
The view might be better in this case if the users are plotted on Y-Axis and the Time is plotted on X-Axis.
Solution:
To change the view of the dashboard chart control, follow the steps below,
Step 1: Click on the chart.
Step 2: Click on the Design tab and click on the Rotate tab which will then rotate the view.

The updated chart below is simple, clear and presents the information without layout issues.

How to define global parameters in XMPro Dashboard and filter data using Global Parameters?
Defining Global Parameters
Often there will be a need to define global parameters in dashboards to pass on values and filter data.
Step 1: Open Dashboard Designer.
Step 2: Click on Parameters on the top tool bar.

Step 3: In the open Parameters Page, you can define your global parameters by providing Name, Description and a Default Value.

In this example, the default value is set to 90 and the global variable name is ‘ExcludeActivitiesGreaterthanDays’. This Global parameter can be used in the dashboard to filter data.
Using the Global Parameter to Filter Data
Now we have defined our global parameter, we now want to use the Global parameter to filter data records that are present in a dashboard chart control.
Step 1: Right click the chart control and click on “Edit Filter” where we wanted to apply filter to exclude all records where the data is more than the global parameter value.
Example:
This presents Top 10 Time Consuming Activities, excluding records wherein the activity time is greater than 90 days.

How do I plot values inside the chart control?
By default, the chart control plots the arguments on X-axis and plots the values on Y-axis as shown in the image below.

The chart presents the users on X-axis and time consumed on Y-axis. If I want to find out for each user the exact time consumed, this representation is a bit difficult and not clearly visible. In this case, it might be beneficial to display the value for each user inside the chart bar.
To display the value inside the chart bar:
Step 1: Click on the existing designed chart in the dashboard designer.
Step 2: Click on the little Chart Icon next to the Values.

Step 3: In the opened ‘Series Options’ page navigate to Point Label Options, select ‘Value’ in Content Drop Down and Select ‘Inside’ in Position Drop Down and click OK.

This will now present the value associated with each user inside the chart bars as shown below.

How to view only few data points in a dashboard chart?
Issue:
Often there would be a requirement that you want to view the top 5 or 10 data points in a chart by default.
Solution:
Step 1: Click on the chart where you wanted to view 10 points at a time.
Step 2: Click on the “Design” tab and click on X-Axis settings.

Step 3: In the open X-Axis settings page, Click on “Limit visible points”, mention the exact number of items you wanted to view at a time and click OK.

Step 4: The chart will now present only 10 data items.

Last updated
Was this helpful?