Deploy XMPro on Azure
Introduction
Get your XMPro intelligent digital twin platform running on Microsoft Azure quickly and reliably with Terraform automation. You'll deploy in two simple steps - first the infrastructure (databases, storage, networks), then the applications. This two-step approach lets you update applications without touching your infrastructure.
Note
This guide works on Windows, Mac, and Linux. Windows users should use Command Prompt or PowerShell.
Provision Infrastructure Your Own Way?
Note
Infrastructure provisioning is your responsibility. The Terraform module in this guide is provided as an example only and is not officially supported by XMPro. You are responsible for infrastructure configuration, maintenance, and support. See the Deployment Responsibility Matrix for details.
Tip
The example Terraform infrastructure module uses B2 App Service Plans (2 vCPU, 3.5GB RAM) and Basic SQL databases by default. This sizing is suitable for development and evaluation. For production sizing recommendations based on your workload, see the Sizing Guideline.
You can provision the required infrastructure using:
- The example Terraform module (community-supported)
- Azure Portal (ClickOps)
- Your organization's infrastructure-as-code tools
If you provision infrastructure yourself, you'll need to create these resources before deploying applications:
Required Infrastructure:
- [ ] Resource Group - 1 logical grouping for all XMPro resources
- [ ] Azure SQL Server - 1 server with 3-4 databases (SM, AD, DS, and optionally AI)
- [ ] Storage Account - 1 account for deployment artifacts and application files
- [ ] App Service Plans - 3-4 separate Linux plans (one for SM, AD, DS, and optionally AI)
- [ ] Key Vaults - 3-4 separate vaults (one for SM, AD, DS, and optionally AI)
- [ ] Application Insights - 1 instance for monitoring (recommended)
- [ ] Log Analytics Workspace - 1 workspace for centralized logging (recommended)
Optional Infrastructure (for production environments):
- [ ] Master Data SQL Server - Separate SQL server and database for master data (
create_masterdata = true) - [ ] Virtual Network (VNet) - For network isolation and security (
prod_networking_enabled = true)- [ ] Subnets - Presentation, application, and data tiers (required if VNet enabled)
- [ ] Network Security Groups (NSGs) - Firewall rules for each subnet (created with VNet)
- [ ] Private DNS Zones - For private endpoint name resolution:
privatelink.database.windows.net,privatelink.blob.core.windows.net,privatelink.file.core.windows.net,privatelink.redis.cache.windows.net,privatelink.vaultcore.azure.net(created with VNet) - [ ] Private Endpoints - Secure private connections to SQL Server, Storage Account, Redis Cache, and Key Vault (created with VNet)
- [ ] Redis Cache - For distributed caching and auto-scaling (
create_redis_cache = true, requires VNet) - [ ] Public DNS Zone - For custom domain management (
enable_custom_domain = true)- [ ] DNS Records - A records for each service (SM, AD, DS, AI) pointing to App Services
- [ ] Azure AD Authentication for SQL (
enable_sql_aad_auth = true) - Requires:- [ ] User-Assigned Managed Identities - One for each service (SM, AD, DS, AI)
- [ ] SQL Server AAD Admin - Configured with appropriate permissions
- [ ] Azure Monitor Alerting - For Stream Host container monitoring
Once you've created these resources, you can skip to Step 5: Deploy Application Layer and provide the infrastructure details in your configuration.
Prerequisites
You need:
- An Azure account with a subscription
- A computer with internet access
Quick Deployment
1. Install Required Tools
Install these on your computer:
- Git: Download here
- Terraform: Download here
- Azure CLI: Download here
Verify they work:
Windows (Command Prompt or PowerShell):
git --version
terraform version
az version
Mac/Linux:
git --version
terraform version
az version
2. Login to Azure
All platforms:
# Login to your Azure account
az login

# Set your subscription (if you have multiple)
az account set --subscription "YOUR-SUBSCRIPTION-NAME-OR-ID"
Tip
Terraform will automatically use your Azure CLI credentials. If you prefer using environment variables or service principals, see the advanced setup below.
Optional: Use ARM environment variables instead
If you can't use az login (e.g., in CI/CD pipelines), set these environment variables:
Windows (PowerShell):
$env:ARM_SUBSCRIPTION_ID = "your-subscription-id"
$env:ARM_TENANT_ID = "your-tenant-id"
$env:ARM_CLIENT_ID = "your-service-principal-id"
$env:ARM_CLIENT_SECRET = "your-service-principal-password"
Mac/Linux:
export ARM_SUBSCRIPTION_ID="your-subscription-id"
export ARM_TENANT_ID="your-tenant-id"
export ARM_CLIENT_ID="your-service-principal-id"
export ARM_CLIENT_SECRET="your-service-principal-password"
For more details, see Microsoft's Terraform on Azure documentation.
3. Get the Deployment Files
Windows (PowerShell):
# Download the deployment configuration
git clone {{TERRAFORM_MODULE_URL}}.git
cd terraform-xmpro-azure\examples\layered\infra

# Create your configuration
Copy-Item terraform.tfvars.example terraform.tfvars
Windows (Command Prompt):
# Download the deployment configuration
git clone {{TERRAFORM_MODULE_URL}}.git
cd terraform-xmpro-azure\examples\layered\infra

# Create your configuration
copy terraform.tfvars.example terraform.tfvars
Mac/Linux:
# Download the deployment configuration
git clone {{TERRAFORM_MODULE_URL}}.git
cd terraform-xmpro-azure/examples/layered/infra

# Create your configuration
cp terraform.tfvars.example terraform.tfvars
The infrastructure layer uses sensible defaults. You can deploy as-is or customize settings in terraform.tfvars.example - see the GitHub documentation for all available options.
4. Deploy Infrastructure Layer
All platforms:
terraform init    # Prepare Terraform
terraform apply   # Deploy infrastructure (type 'yes' when asked)
This creates the foundation: databases, storage, networks, and App Service Plans. Deployment takes about 10-15 minutes.
5. Deploy Application Layer
Now deploy the XMPro applications on top of the infrastructure:
Windows (PowerShell):
cd ..\app
Copy-Item terraform.tfvars.example terraform.tfvars
Windows (Command Prompt):
cd ..\app
copy terraform.tfvars.example terraform.tfvars
Mac/Linux:
cd ../app
cp terraform.tfvars.example terraform.tfvars
First, get the infrastructure values:
All platforms:
# Go back to infra folder
cd ..\infra    # Windows
cd ../infra    # Mac/Linux

# Get the values you need
terraform output
Copy the resource_group_name and sql_server_fqdn values shown.
Then edit terraform.tfvars in the app folder with your values:
# Infrastructure references (use the actual values from "terraform output" above)
resource_group_name = "rg-mycompany-dev001"        # Replace with your value
sql_server_fqdn = "sql-mycompany-dev001.database.windows.net"  # Replace with your value

# Application passwords - Change these!
site_admin_password = "YourStrongPassword123!"
company_admin_password = "YourCompanyPassword123!"

# Company admin details - Change these!
company_admin_email_address = "admin@yourcompany.com"
company_admin_first_name = "John"
company_admin_last_name = "Doe"

# Evaluation mode - Set to true for testing/demo (includes licenses)
is_evaluation_mode = true
Deploy the applications:
All platforms:
terraform init    # Prepare Terraform
terraform plan    # Review what will be deployed and check for errors
terraform apply   # Deploy applications (type 'yes' when asked)
Tip
The terraform plan step validates your configuration and shows exactly what will be created. If there are errors in your inputs (like incorrect infrastructure references), you'll see them here before deploying.
This deploys all XMPro applications and takes about 5-10 minutes.
6. Access XMPro
After deployment completes:
All platforms:
terraform output # Shows your URLs
Login to Subscription Manager with either account:
| Account Type | Username | Password | Purpose |
|---|---|---|---|
| Site Admin | admin@xmpro.onxmpro.com |
Your site_admin_password |
Full system access, license management |
| Company Admin | firstname.lastname@yourcompany.onxmpro.com |
Your company_admin_password |
Company management, normal operations |
Note
Replace firstname.lastname and yourcompany with the values you set in terraform.tfvars.
That's It!
XMPro is now running on Azure with this architecture:
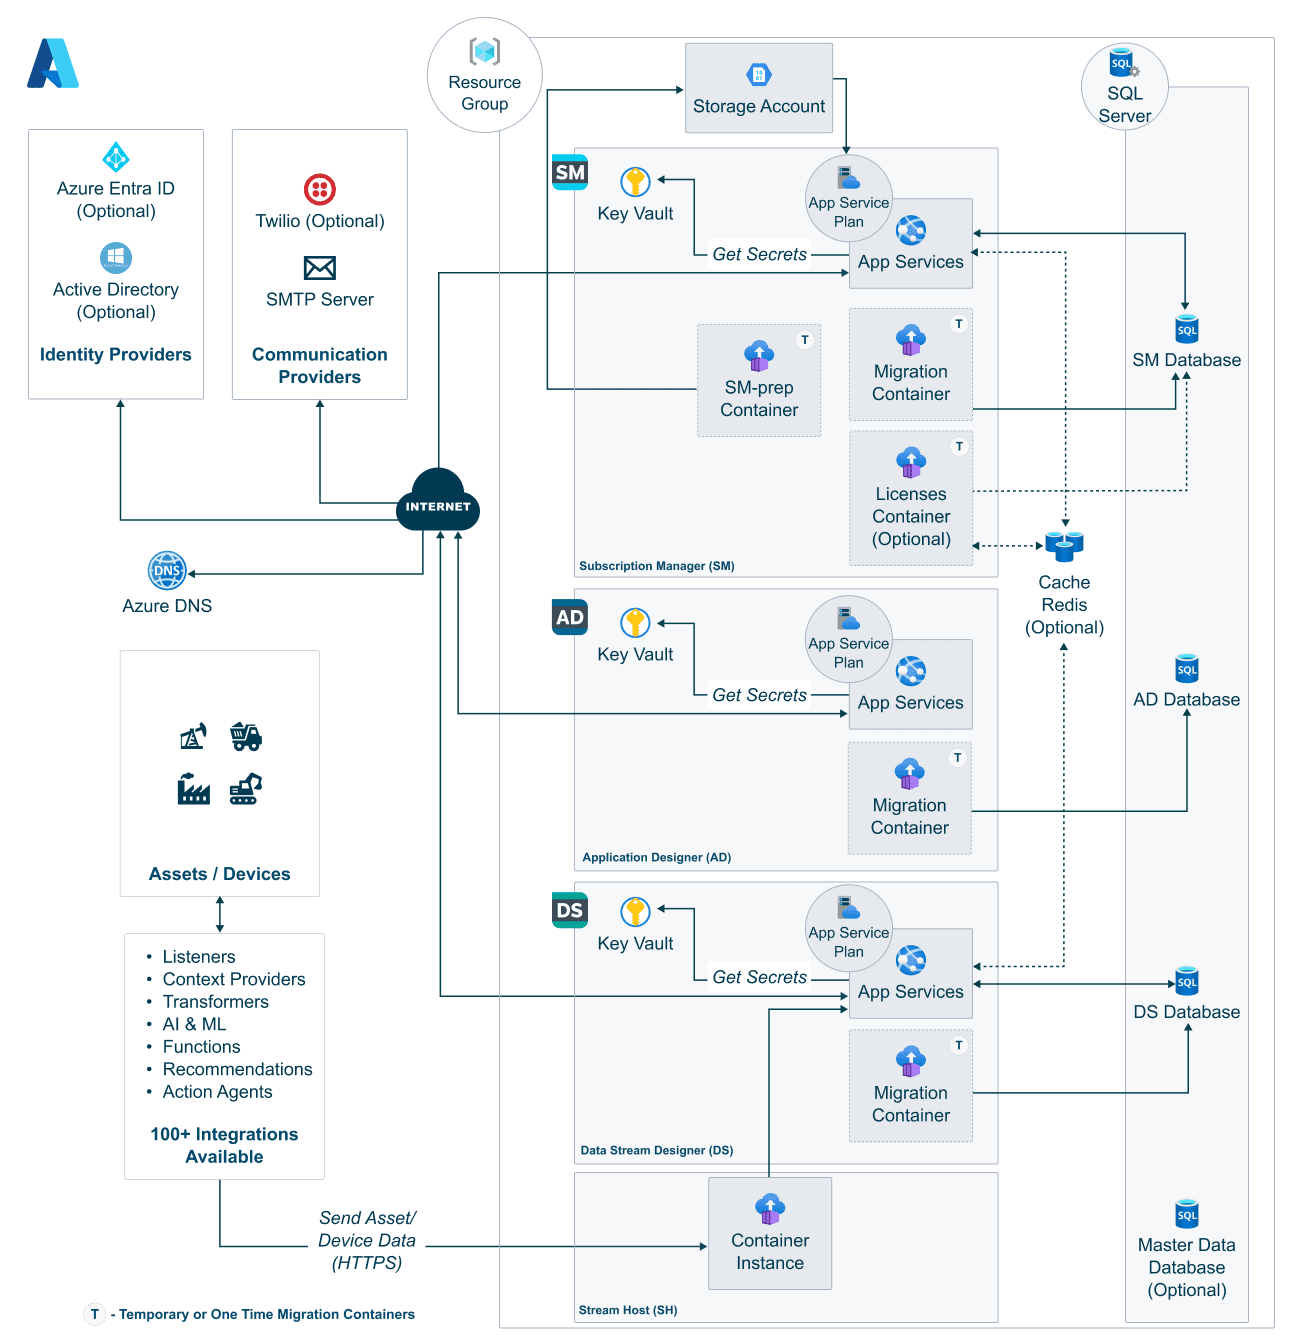
Your deployment includes:
- ✅ All XMPro applications (SM, AD, DS, Stream Host)
- ✅ SQL databases for each component
- ✅ Key Vault for secret management
- ✅ Application Insights monitoring
- ✅ Storage accounts for files
- ✅ SSL certificates automatically configured
What's Next?
For guides in setting up your first tenant, uploading agents and connectors, or deploying additional stream hosts, refer to the Post Deployment Guide
Need Help?
Common Issues
"terraform: command not found" → You haven't installed Terraform yet. Go back to step 1.
"Please ensure you have logged in"
→ Run az login again
"Resource already exists"
→ Add prefix = "unique123" to your terraform.tfvars
Takes longer than 20 minutes? → First deployment can take up to 30 minutes. Check Azure Portal to see progress.
More Resources
- Upgrade from Legacy ARM Deployment - Migrate from ARM templates
- Sizing Guideline - Production sizing guideline
- Troubleshooting Guide - Fix common problems
- Advanced Configuration - Production settings
- Complete Documentation
Next Steps
After completing your infrastructure deployment, proceed to:
Post-deployment - Complete the setup and configuration of your XMPro environment.
Cleanup
To remove everything and stop Azure charges:
All platforms:
terraform destroy
Note
For advanced features like custom domains, SMTP, existing databases, and multiple stream hosts, see the Advanced Configuration Guide or the GitHub documentation.
Last modified: May 01, 2026