Deploy XMPro on Windows Server 2022
Introduction
Deploy the XMPro platform on Windows Server 2022 using native IIS hosting in under 30 minutes with our interactive installer. This guide walks you through a single-server installation where all XMPro products run on one server using IIS web applications and Windows services.
Note
This guide uses native IIS deployment - not containers. XMPro applications run as IIS web applications and Windows services.
Tip
This guide deploys all XMPro products to a single server by default. This is suitable for development and evaluation. For production sizing recommendations based on your workload, see the Sizing Guideline.
Single-Server Architecture
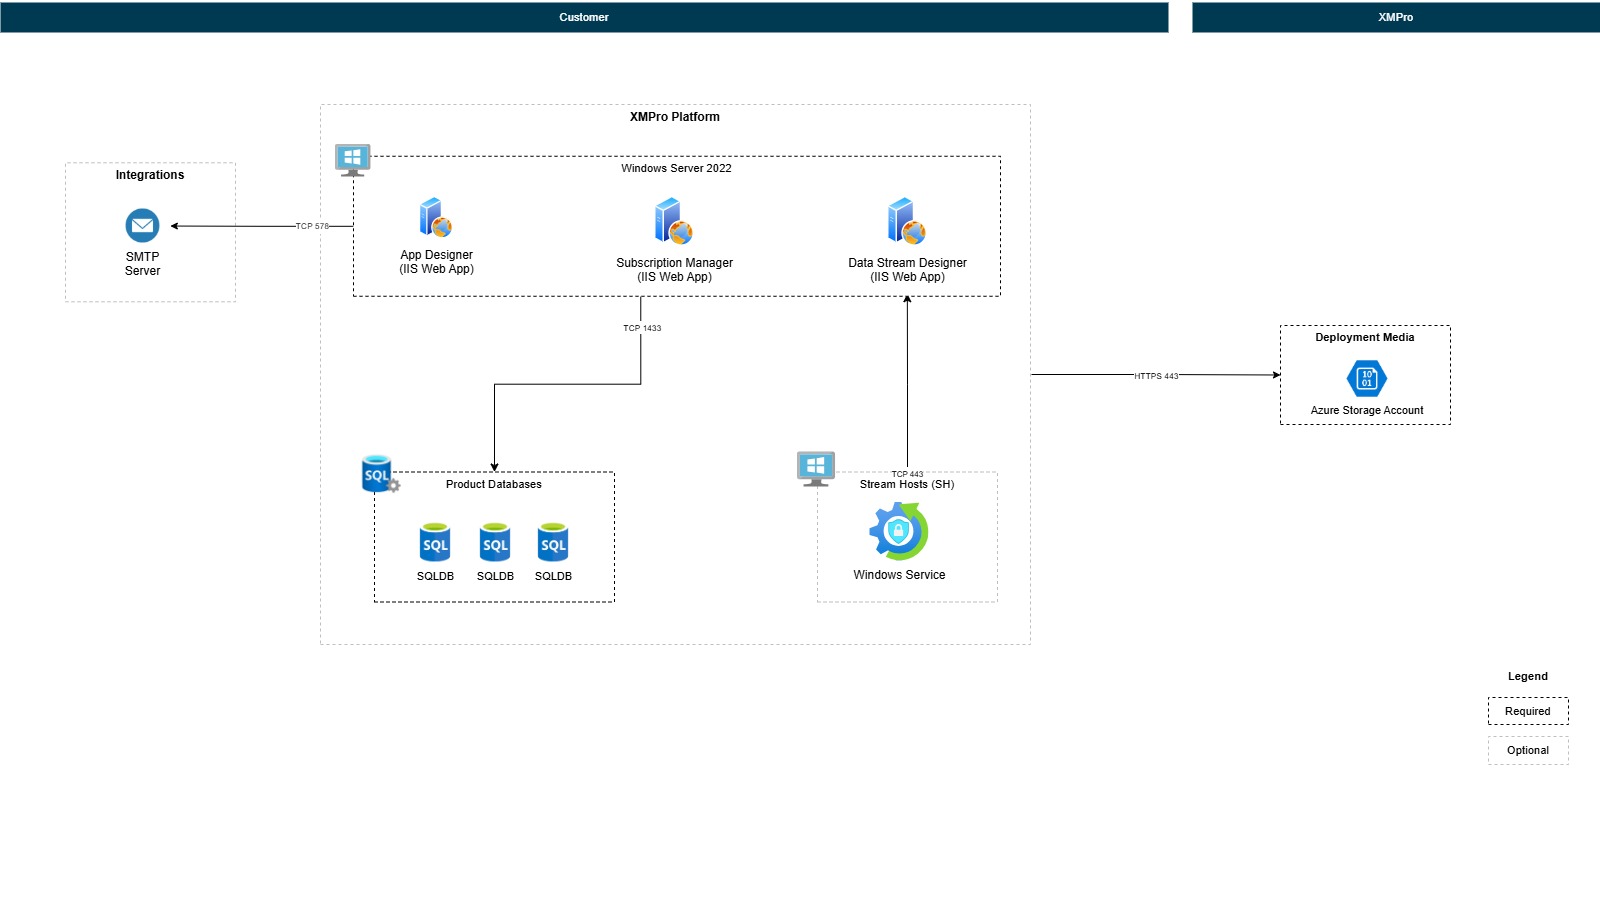
Prerequisites
Before installing XMPro applications, ensure your Windows Server has the following components installed.
Software Requirements
| Component | Version | Details |
|---|---|---|
| Operating System | Windows Server 2022 | Standard or Datacenter edition, updated with the latest Windows Updates. |
| SQL Server | 2022 (Standard) | Mixed Mode authentication enabled. Database Account: Create a dedicated user account (e.g., xmadmin) with only required permissions (dbcreator and securityadmin roles) instead of using the built-in sa account.• dbcreator allows creating databases• securityadmin allows managing database loginsCertificate Trust: In production, configure the Windows Server to trust the SQL Server certificate. For non-production environments, answer Y (Yes) when prompted "Trust SQL Server Certificate?" during installation (less secure). See Troubleshooting for detailed setup instructions. |
| IIS | 10.0+ | Web Server role with required features: • Common HTTP Features (Default Document, Static Content) • Application Development (ASP.NET 4.8, .NET Extensibility 4.8) • Health and Diagnostics (HTTP Logging) • Security (Request Filtering) • Management Tools (IIS Management Console) |
| IIS URL Rewrite Module | 2.1+ | Required for application routing. |
| .NET Framework | 4.8 | Required for legacy compatibility. |
| .NET 8 Hosting Bundle | 8.0+ | Critical: Must install the Hosting Bundle. |
| HTTP.sys Configuration | Registry settings | Increase max header size to prevent HTTP 400 errors.MaxFieldLength = 65536MaxRequestBytes = 65536See Troubleshooting Guide for configuration steps. |
Certificate Requirements
| Certificate Type | Purpose | File Format | Notes |
|---|---|---|---|
| Signing Certificate | JWT token signing for inter-product authentication. | .pfx with password |
Self-signed or CA-issued. 4096-bit RSA key recommended. See Troubleshooting Guide for creation example. |
| SSL Certificate | HTTPS encryption for web traffic. | .pfx with password |
Production: Use certificate from trusted CA. Testing: Self-signed acceptable. Must include hostname in Subject Alternative Names (SAN). |
Quick Deployment
Run the Installer
Open CMD (Command Prompt as Administrator) on your Windows Server and run:
powershell.exe -ExecutionPolicy Bypass -Command "$env:SCRIPT_URL='{{INSTALL_URL_PREFIX}}{{VERSION}}/install-xmpro-application.ps1'; iex (irm $env:SCRIPT_URL)"
This command downloads and runs the interactive installer in one step. The installer will launch a configuration wizard that guides you through setup.
Configuration Prompts
The installer will ask you several questions. Here's what each prompt means:
1. Product Selection
The following prompts will ask you sequantially on which of the XMPro components you want to install. The default value for each prompt is "Y" for yes but you are open to choose no (by typing "N") if you only want to install select XMPro Components. However, some components might require existing installation of other components which is also detailed on the table below:
| Prompt | What It Means | Default Value |
|---|---|---|
| Install SM? (y/n) | Whether to install Subscription Manager. A non-Y/y input means installation of Subscription Manager will be skipped. Required first when installing AD/DS. | y |
| Install AD? (y/n) | Whether to install App Designer. A non-Y/y input means installation of App Designer will be skipped. Requires an existing SM Installation. | y |
| Install DS? (y/n) | Whether to install Data Stream Designer. A non-Y/y input means installation of Data Stream Designer will be skipped. Requires an existing SM Installation. | y |
| Install SH? (y/n) | Whether to install Stream Host. A non-Y/y input means installation of Stream Host will be skipped. | y |
2. Database Configuration
| Prompt | What It Means | Default Value |
|---|---|---|
| Database Server | SQL Server instance to connect to. Examples: • Local: localhost or hostname• External: sql-server.yourcompany.com• Custom port: hostname,1433External SQL Server requirements: • TCP/IP enabled on port 1433 • Mixed authentication mode enabled • Firewall allows connections from Windows Server |
hostname |
| Database Username | The dedicated SQL Server user account created in prerequisites. | xmadmin |
| Database Password | The SQL Server password you want to set for the created SQL Account. | (required - no default) |
| Database Protocol | SQL Server connection protocol.tcp = standard for network connectionsnp = named pipes (local only) |
tcp |
| Trust SQL Server Certificate | Whether to trust SQL Server certificate without validation. Production: Select N (No) and configure Windows Server to trust the SQL Server certificate.Non-Production: Select Y (Yes) for quick setup (less secure).See Troubleshooting for certificate setup instructions. |
N |
| SM Database Name | Subscription Manager database name (always required as central registry). | SM |
| AD Database Name | App Designer database name. Only asked if AD is selected. |
AD |
| DS Database Name | Data Stream Designer database name. Only asked if DS is selected. |
DS |
| Company Name | Your company name for company admin account (no spaces). Only asked if SM is selected. |
Company |
| Company Admin First Name | First name for company admin account. Only asked if SM is selected. |
System |
| Company Admin Last Name | Last name for company admin account. Only asked if SM is selected. |
Administrator |
| Company Admin Email | Email address for company admin account. Only asked if SM is selected. |
site.admin@yourcompany.com |
| Company Admin Password | Password for company admin account. Only asked if SM is selected. |
(required - no default) |
| Site Admin Password | Password for site admin account: admin@xmpro.onxmpro.com.Only asked if SM is selected. |
(required - no default) |
| Use separate SM database credentials? (y/n) | Use different database credentials for SM. Only asked if SM is selected. |
n |
| Use separate AD database credentials? (y/n) | Use different database credentials for AD. Only asked if AD is selected. |
n |
| Use separate DS database credentials? (y/n) | Use different database credentials for DS. Only asked if DS is selected. |
n |
| Enable SMTP configuration? (y/n) | Enable email for password resets, notifications, invitations. Only asked if SM or AD is selected. |
n |
Tip
Username Format: Your company admin username will be automatically created as FirstName.LastName@CompanyName.onxmpro.com
Example: If Company Name = "Acme", First Name = "John", Last Name = "Smith", your username will be: John.Smith@Acme.onxmpro.com
Important
SMTP is required for password resets and user invitations. Without SMTP configured, users cannot reset forgotten passwords or receive invitation emails. Configure SMTP now or add it later by editing configuration files.
SMTP Configuration (if enabled)
If you choose to enable SMTP, you'll be prompted for these additional settings:
| Prompt | What It Means | Default Value |
|---|---|---|
| SMTP Server | SMTP server address (e.g., smtp.gmail.com). |
(required - no default) |
| SMTP Port | SMTP port number (usually 587 for TLS or 465 for SSL). |
587 |
| Enable SSL? (y/n) | Enable SSL/TLS encryption for SMTP connection. | y |
| SMTP Username | SMTP authentication username (e.g., notifications@yourcompany.com). |
(required - no default) |
| SMTP Password | SMTP authentication password (or app password). | (required - no default) |
| From Email Address | Email address to use as sender for system notifications. | (required - no default) |
3. Product Configuration
Basic Configuration
Note
Hostname: Enter the DNS name users will use to access XMPro (e.g., xmpro.yourcompany.com). Use localhost for local-only access.
Internal Base URL: Only needed if using a reverse proxy or load balancer where internal server URLs differ from external URLs. Leave default for most installations.
| Prompt | What It Means | Default Value |
|---|---|---|
| SM Hostname | DNS name where SM will be accessed. | localhost |
| SM Listen Port | Port for SM web application. | 5201 |
| SM Internal Base URL (if different) (optional) | Internal URL for SM (if different from external). | https://hostname |
| AD Hostname | DNS name where AD will be accessed. | localhost |
| AD Listen Port | Port for AD web application. | 5202 |
| AD Internal Base URL (if different) (optional) | Internal URL for AD (if different from external). | https://hostname:5202 |
| DS Hostname | DNS name where DS will be accessed. | localhost |
| DS Listen Port | Port for DS web application. | 5203 |
| DS Internal Base URL (if different) (optional) | Internal URL for DS (if different from external). | https://hostname:5203 |
SSL Certificates
| Prompt | What It Means | Default Value |
|---|---|---|
| SM SSL Certificate Path | Path to SSL certificate file for SM (e.g., C:\XMPro\Certificates\ssl.pfx).Only asked if SM is selected. |
(required - no default) |
| SM SSL Certificate Password | Password for SM SSL certificate. Only asked if SM is selected. |
(required - no default) |
| Token Certificate Path | Path to JWT signing certificate file (e.g., C:\XMPro\Certificates\sign.pfx).Only asked if SM is selected. |
(required - no default) |
| Token Certificate Password | Password for JWT signing certificate. Only asked if SM is selected. |
(required - no default) |
| AD SSL Certificate Path | Path to SSL certificate file for AD. Only asked if AD is selected. |
(required - no default) |
| AD SSL Certificate Password | Password for AD SSL certificate. Only asked if AD is selected. |
(required - no default) |
| DS SSL Certificate Path | Path to SSL certificate file for DS. Only asked if DS is selected. |
(required - no default) |
| DS SSL Certificate Password | Password for DS SSL certificate. Only asked if DS is selected. |
(required - no default) |
Stream Host Configuration (if SH selected)
| Prompt | What It Means | Default Value |
|---|---|---|
| Stream Host Install Path | Directory where Stream Host will be installed. | C:\XMPro\StreamHost |
| Device Name | Unique name for this Stream Host instance (will appear in Data Stream Designer). | StreamHost-hostname |
| Data Stream Designer URL | DS URL for Stream Host to connect to. | https://hostname:5203 |
Note
Configuration is saved to C:\XMPro\ - you'll see these as defaults if you reinstall.
Installation Process
After answering the prompts, the installer will:
✅ Validate configuration - Tests SQL Server connection to the database and validates certificates
If validation fails, you'll see the specific error and be prompted to:
- (r) Retry - Re-enter your credentials
- (s) Skip - Continue anyway (may cause installation to fail later)
✅ Migrate databases - Create and populate SM, AD, DS databases (takes 5-10 minutes)
✅ Download products - Get latest XMPro application packages
✅ Deploy to IIS - Create application pools and websites
✅ Install Stream Host - Set up Windows service (if selected)
✅ Configure applications - Apply settings and start services
Installation time: 15-30 minutes depending on download speed and server performance.
Note
The installer shows progress for each step.
Access XMPro
After installation completes, the installer displays your access URLs:
Subscription Manager (SM):
https://localhost:5201
App Designer (AD):
https://localhost:5202
Data Stream Designer (DS):
https://localhost:5203
Login Credentials
| Account Type | Username | Password | Purpose |
|---|---|---|---|
| Site Admin | admin@xmpro.onxmpro.com |
Your site admin password | Full system access, license management. |
| Company Admin | FirstName.LastName@CompanyName.onxmpro.comExample: John.Smith@Acme.onxmpro.com |
Your company admin password | Company operations, user management. |
Tip
Cannot access?
- Check Windows Firewall allows ports 5201, 5202, 5203
- Verify IIS applications are running: Open IIS Manager → Application Pools
- Check certificate trust: See Troubleshooting for certificate issues
What Gets Installed
IIS Websites
- XMPro-SM: Subscription Manager (
C:\inetpub\wwwroot\XMPro-SM) - XMPro-AD: App Designer (
C:\inetpub\wwwroot\XMPro-AD) - XMPro-DS: Data Stream Designer (
C:\inetpub\wwwroot\XMPro-DS)
Database Migration Results
- SM Database: Identity, licensing, company data
- AD Database: Applications, pages, dashboards
- DS Database: Data streams, agents, collections
Windows Services
- StreamHost-{hostname}: Data stream execution service
Configuration Files
- C:\XMPro\Global-variables.json: Main configuration
- C:\XMPro\Global-settings.json: Auto-generated settings (Product IDs, Collection secrets)
- C:\XMPro\SM-variables.json: SM-specific settings
- C:\XMPro\AD-variables.json: AD-specific settings
- C:\XMPro\DS-variables.json: DS-specific settings
Note
Configuration files are preserved across reinstalls - you'll see your previous settings as defaults.
Warning
Security Best Practice: For production environments, move sensitive secrets (database passwords, certificate passwords, SMTP credentials) from these configuration files to encrypted secure storage solutions such as Azure Key Vault, HashiCorp Vault, or Windows Credential Manager. This reduces the risk of credential exposure.
Need Help?
More Resources
- Upgrade from Legacy Windows Installer - Upgrade from v4.4.x to v4.5
- Sizing Guideline - Production sizing guideline
- Troubleshooting Guide - Fix common issues
- Multi-Server Deployment - Deploy across multiple servers
- Airgapped Deployment - Offline installation
Next Steps
After completing your Windows Server deployment, proceed to:
Post-deployment - Complete the setup and configuration of your XMPro environment.
Common Installation Scenarios
Reinstalling or Updating
To reinstall without losing configuration:
# Uses existing configuration from C:\XMPro\
.\install-xmpro-application.ps1 -SkipPrompts
Note
This installer uses native IIS deployment - not Docker containers. All XMPro applications run as standard IIS web applications with dedicated application pools.
Last modified: May 01, 2026